奶酪字-photoshop艺术字教程
19、将“图层1副本2”层设置为当前层,然后按“向下”键7次和“向右”键6次,将“图层1副本2”文字向右下角轻微移动,在执行“亮度/对比度”命令,在弹出的对话框中将“亮度”参数设置为“-60”。
20、将“图层1”层设置为当前层,然后按“向下”键9次和“向右”键8次,将“图层1”文字向右下角轻微移动,在执行“亮度/对比度”命令,在弹出的对话框中将“亮度”参数设置为“-65”,调整后的画面文字效果如图11所示。
21、将“图层1”设置为当前层,并将其与“图层1副本2—图层1副本5”层链接,然后按“Ctrl+E”键,将链接的图层合并到“图层1”中。
22、选择菜单栏中的“滤镜”“模糊”“高斯模糊”命令,在弹出的对话框中设置“半径”参数为0.6像素,单击好。

23、按住“Ctrl”键,单击“图层”面板中的“图层1”,为其添加选区,如图12所示。

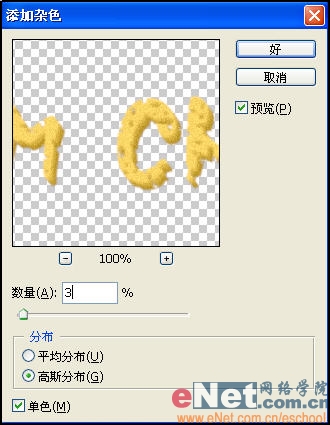
24、选择菜单栏中的“滤镜”“杂色”“添加杂色”命令,弹出的对话框设置如图13所示。
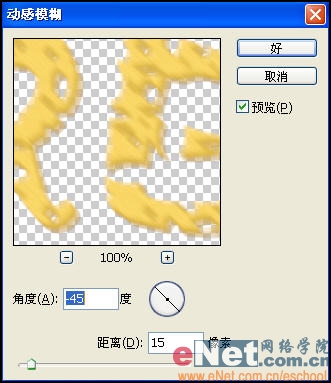
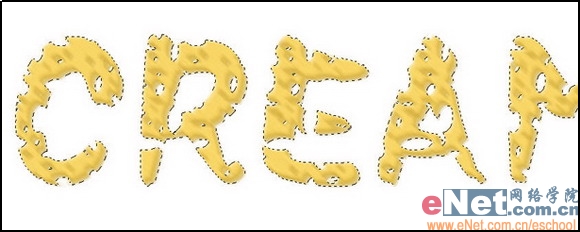
25、选择菜单栏中的“滤镜”“模糊”“高斯模糊”命令,弹出的对话框设置如图14所示,效果如图15所示。
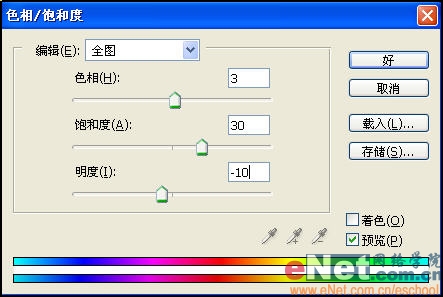
26、按“Ctrl+U”键,弹出“色相/饱和度”对话框,参数设置如图16所示,调整后的效果如图17所示。

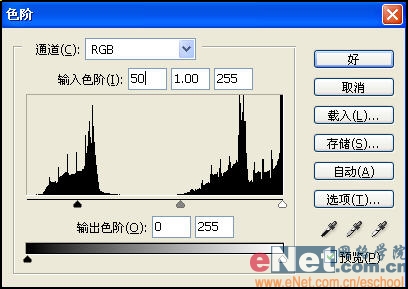
27、按“Ctrl+L”键,弹出“色阶”对话框,参数设置如图18所示,单击好。
28、取消选区,然后在图层面板中将“图层1副本”层显示,显示“图层1副本”层后的画面效果如图19所示。

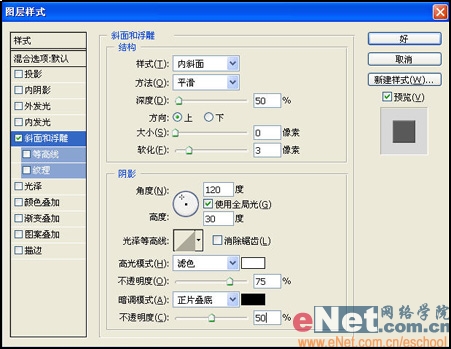
29、在图层面板中,将“图层1副本”层设置为当前层,然后选择菜单栏中的“图层”“图层样式”“斜面和浮雕”命令,弹出“图层样式”对话框,设置参数如图20,效果如图21所示。

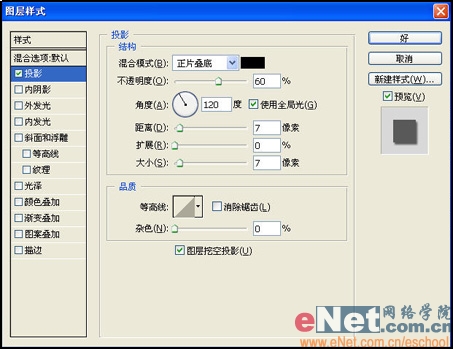
30、在图层面板中,将“图层1”层设置为当前层,然后选择菜单栏中的“图层”“图层样式”“投影”命令,弹出“图层样式”对话框,设置参数如图22,效果如图23所示。

31、为做好的效果加上自己喜欢的底图。
